What is a Point and Figure Chart?
According to Investopedia, a point and figure chart is:
“A chart that plots day-to-day price movements without taking into consideration the passage of time. Point and figure charts are composed of a number of columns that either consist of a series of stacked Xs or Os. A column of Xs is used to illustrate a rising price, while Os represent a falling price. This type of chart is used to filter out non-significant price movements, and enables the trader to easily determine critical support and resistance levels. Traders will place orders when the price moves beyond identified support/resistance levels.
Additional points are added to the chart once the price changes by more than a predefined amount (known as the box size). For example, if the box size is set to equal one and the price of the asset is $15, then another X would be added to the stack of Xs once the price surpasses $16. Each column consists of only one letter (either X or O) - never both. New columns are placed to the right of the previous column and are only added once the price changes direction by more than a predefined reversal amount.” - Investopedia
I couldn’t have written a better definition myself so I feel comfortable using the one from Investopedia.com. I use point and figure analysis every night while scanning my charts because I can easily determine important support and resistance levels. As with any type of chart, many indicators can setup to offer buy and sell signals but I stick to the basics and only trade a few patterns that the point and figure charts offer.
Please understand that I use point and figure charts as a secondary technical analysis tool behind candlestick charts (both daily and weekly). When I find an interesting stock that has already passed my fundamental criteria and peeked my interest on the candlestick chart, I then view the point and figure chart (will be referred to as a P&F from this point forward). Support and resistance levels can be found using basic candlestick and bar charts but P&F charts eliminate the unimportant noise by setting-up the critical levels and breakouts or breakdowns with the more important (larger) moves.
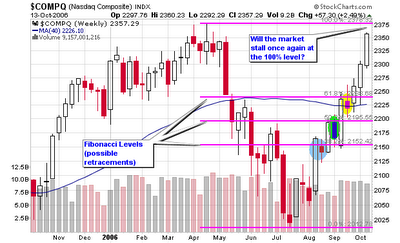
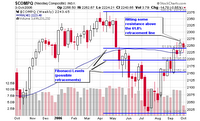
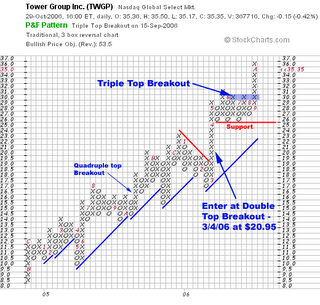
My favorite pattern setup is the Triple Top Breakout which occurs when a stock hits a certain level of resistance on three separate occasions, telling me that a move above this zone has some meaning. Not every triple top breakout will be successful but the odds of a breakout above this setup increase dramatically. As with all trading, you must take the signal with proper position sizing and set your stops without thinking like a human. Become mechanical and trade the setups; don’t trade your thoughts and don’t ever trade for pure money. You will be a lot more successful if you learn to trade the setups rather than everything else. The NASDAQ recently broke out of a triple top breakout but has since reversed (near the 100% retracement level on my Fibonacci chart – seen in other posts on this blog). Tower Group (TWGP), a long time favorite of MSW has recently confirmed another triple top breakout and has successfully moved higher since forming the resistance.
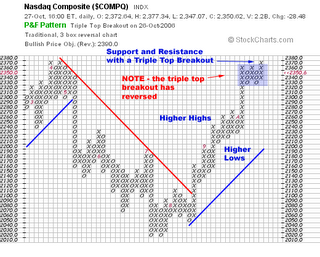
So what is the true definition of a triple top breakout?
According to StockCharts.com
A triple top breakout occurs when prices rise to a certain level and then retreat because the supply outstripped the demand at that level. Prices must rise back to the level on two additional occasions at which they retraced before. If prices continue to carry through that level, a triple top breakout has succeed and given a buy signal. Since this level previously acted as resistance, we now know that demand is currently exceeding supply and an entry area is born.
A triple bottom breakdown is similar to a triple top breakout except we reverse the rules and look for a breakdown where the price has retraced from the same area two times before (see the example of RHAT). This implies that the price level is a significant area of support and is an area where buyers are willing to buy the stock and create demand that outstrips supply. The breakdown below this level implies that the sellers are now creating more supply than there is demand and therefore the prices are breaking down.

A quadruple top breakout is similar to a triple top breakout, except that the prices break out after retracing from the same level three times. The fourth time the demand was able to outstrip the supply at the price level, and prices broke out with a quadruple top breakout. I have provided an example of this breakout with the chart of FDS (it actually setup five levels of resistance instead of four).
A quadruple bottom breakdown is similar to a triple bottom breakdown, except that the prices break down after retracing from the same level three times. The fourth time the supply was able to outstrip the demand at the price level, and prices broke down with a quadruple bottom breakdown.
Now let’s look to some further basics of the P&F chart (all explainations are provided by StockCharts.com):
Point & Figure charts consist of columns of X's and O's that represent filtered price movements over time. Their distinctive look may be alien at first to people who are more familiar with traditional price bar charts but once people learn the basics of P&F charts they usually become hooked.
There are several advantages to using P&F charts instead of the more traditional bar or candlestick charts. P&F charts automatically
Eliminate the insignificant price movements that often make bar charts appear 'noisy,'
Remove the often misleading effects of time from the analysis process,
Make recognizing support/resistance levels much easier,
Make trend line recognition a 'no-brainer',
Help you stay focused on the important long-term price developments,
On a P&F chart price movements are combined into either a rising column of X's or a falling column of O's. If you are familiar with standard chart analysis, you can think of each column as representing either an uptrend or a downtrend. Each X or O occupies what is called a box on the chart. Each chart has a setting called the Box Size that is the amount that a stock needs to move above the top of the current column of X's (or below the bottom of the current column of O's) before another X (or O) is added to that column. Each chart has a second setting called the Reversal Amount that determines the amount that a stock needs to move in the opposite direction (down if we are in a rising column of X's, up for a column of O's) before a reversal occurs. Whenever this reversal threshold is crossed, a new column is started right next to the previous one, only moving in the opposite direction.
It sounds much more complex than it is, trust me!
In a nutshell, as long as a stock is in an uptrend and it doesn't move down more than the 'reversal distance' (i.e., the box size multiplied by the reversal amount), the P&F chart will show a growing column of X's. Similarly, a stock in a downtrend will cause a descending column of O's to appear. Only when the stock changes direction by more than the reversal distance will a new column be added to the chart.
Traditionally, the box size is set to 1 and the reversal amount is 3 (this is exactly what I use when viewing my charts each night)
It is important to remember that a P&F Box does not represent a single value. Instead, it represents a range of values that is equal to the box size. The number on the vertical axis represents the value of the "floor" of the box. The "ceiling" of the box is equal to the floor plus the box size. If prices move anywhere inside that range of values, the box is filled in with an "X" or and "O" (keep reading for details).

It is important to remember that P&F charts do not show time in a linear fashion. Each column can represent one day, or many days, depending on the price movement. Because P&F charts filter out the noise associated with more traditional charting methods, every mark on the chart is significant. The spacing between months, for example, will not be the same from month to month. Numbers and letters inside the chart itself indicate when a new month has begun. For instance, the number '2' shows where February started. The letters 'A', 'B', and 'C' are used to indicate October, November, and December. (I highlighted the months on the FDS chart where the number 5 is May and the letter A is October).
One of the best places to visit to start learning about P&F charts is through this link at StockCharts.com:
Understanding Point & Figure Charts
I also recommend the book Point and Figure Charting: The Essential Application for Forecasting and Tracking Market Prices, 2nd Edition by Thomas J. Dorsey
It was expensive in the past but the price has come down on Amazon to $37.77 but I would recommend buying it used for $19.99 or visit your local book store. The book is not on my recommendations page due to its former price of $59.95 which I felt was not worth my value. However, at $20, I highly recommend the book to anyone interested in learning about P&F charts.
Piranha
Labels: Charts, Education, Point and Figure


